The ChitChatBot.ai Google Sheets integration is a powerful and versatile tool that enables a wide range of functionalities. With this integration, you can send and retrieve data, fetch random rows, and create dynamic galleries directly from Google Sheets. Whether you’re working on simple setups or complex builds, this integration offers the flexibility to bring your ideas to life.
Connecting ChitChatBot.ai to Google Sheets
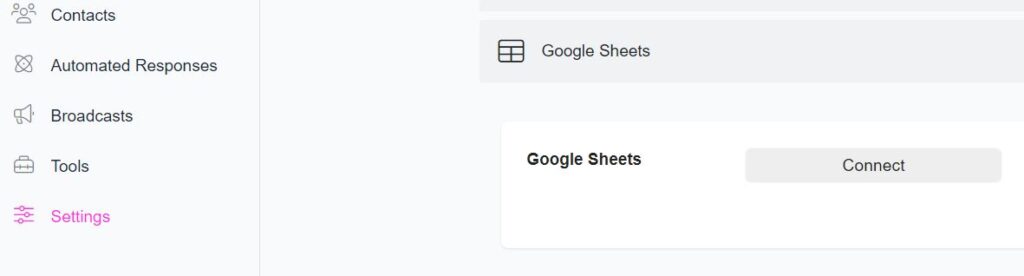
Step 1: Menu > Settings > Integrations
Step 2: Find Google Sheets within the integrations list and click “Connect”
Step 3: A new page will open that allows you select the account associated with the Google Sheet. If you haven’t created a Google Sheet yet, select the Google account you plan to create it on. You can disconnect this connection at anytime.
Step 4: The connection should now be complete, we can now add one or multiple sheets to your ChitChatBot.ai account.
Adding Spreadsheets to ChitChatBot.ai from Google Sheets
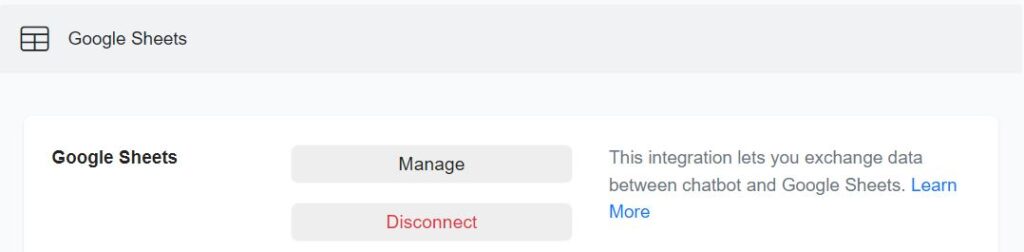
**Step **1: Now we can add a spreadsheet(s). Click Manage > Add > Name your spreadsheet (something suitable/recognizable) > Add the spreadsheet link > Continue
Your spreadsheet link should look similar to this: https://docs.google.com/spreadsheets/d/1vgfsd234-example-random324234/edit
The connection is now setup and a spreadsheet added.
How to use the Google Sheets integration in flows
To use the Google Sheets integration, you’ll need to incorporate it into a flow or setup a “Trigger & Action” rule, for now let’s focus on the flows.
-
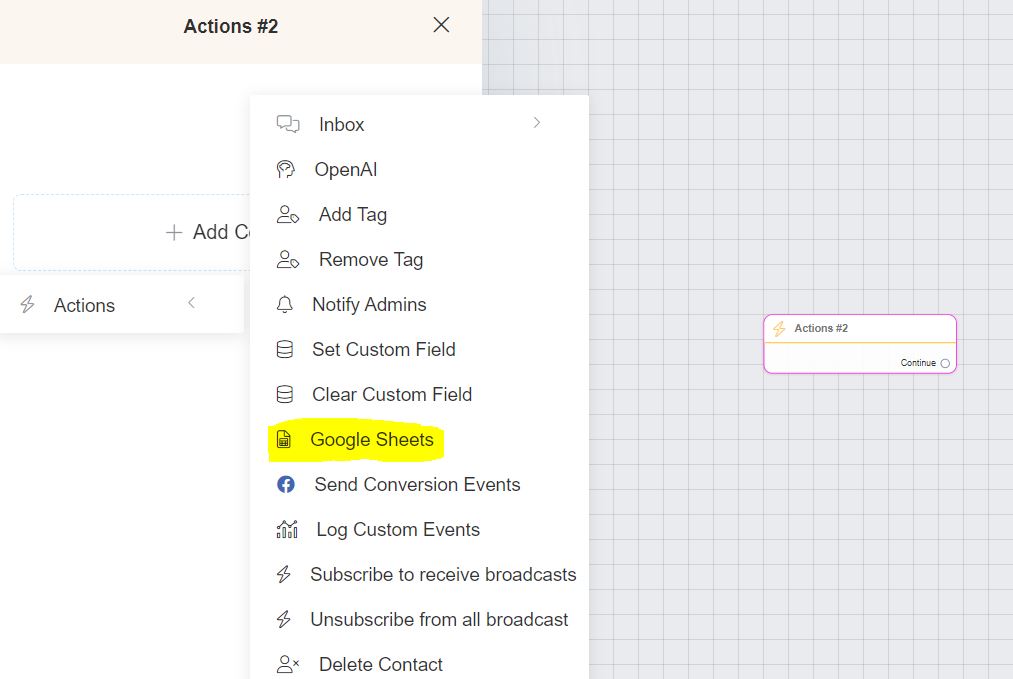
Once you’re in the flow editor, click a message block, click add content and select Action. You can also create a new standalone Action block by clicking the ”+” icon at the bottom of your flow.
-
On your Actions node, you will see a list of all the available actions, click on Google Sheets.
What kind of actions does the Google Sheets integration have?
When integrating with Google Sheets, you can choose from several options based on your specific needs. Here are the currently supported features:
-
Send Data to Google Sheets: Export data to a Google Sheet.
-
Get Row (Value) from Google Sheets: Retrieve a Specific Row Based on a Value. Use this to dynamically populate custom fields and content with data from a specific row in your Google Sheet.
-
Update Google Sheet Row: Modify data in an existing row. This could be used when an existing user completes a key or updates their data.
-
Clear Row (Value) on Google Sheets: Delete the content of a specific row based on a value.
-
Get Random Row in Google Sheets: Fetch a randomly selected row.
-
Create Dynamic Gallery with Google Sheets: Generate a gallery dynamically using data from your Google Sheet. For example, showcase your latest products or display a list of store locations. Updates in your Google Sheet will be instantly reflected in your dynamic gallery.
Setting up your Google Sheet
Before using any of the actions above, you need to create a Google Sheet with some preset information.
For example, if you want to capture subscribers’ data such as name, email, and phone number and export it to a Google Sheet, you’ll need to set up appropriate headers in the sheet where the data will be stored.
-
Create a Google Sheet and name it something like “Subscriber’s Data.”
-
Add headers to each column to organize the data. For instance, you could use the following headers:
Full Name
-
User ID
-
Email
-
Phone Number
These headers will define where the data is exported and how it is structured in the sheet.
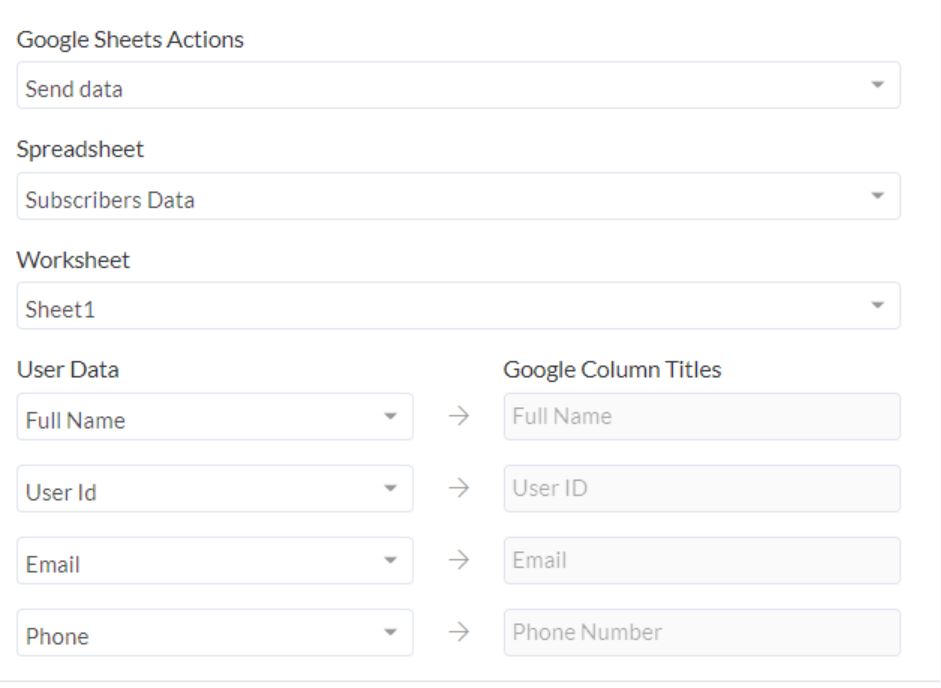
Send Data to Google Sheets
After collecting all the necessary information, you can use the Send Data to Google Sheets action within Chitchatbot.ai.
-
Select the Action: Choose the Send Data to Google Sheets action and specify the spreadsheet where you want the data to be exported.
-
Pick the Worksheet: Select the specific worksheet within the spreadsheet where the data should be sent.
-
Map Data to Columns: Match the data collected by Chitchatbot.ai to the corresponding column titles in your Google Sheet. You can map:
Custom Fields: Data points unique to your bot flow.
-
Subscriber Data: General user information like name or email.
-
Bot Data: Any additional information generated during the conversation.
-
Data Export: Once a subscriber completes the chatbot flow and you’ve added the Send Data action at the end, all the mapped data will be exported automatically to the designated columns in the Google Sheet.
Getting Data From Google Sheets With Get Row(Value)
Instead of exporting data to a Google Sheet, Chitchatbot.ai can also fetch data from a Google Sheet and display it to the subscriber within the chatbot.
Imagine your client owns a fitness studio that updates its class schedule every week. Customers often ask about the latest class times and availability. Instead of updating the bot manually every time the schedule changes, your client can simply update a Google Sheet.
Whenever the schedule is updated in the Google Sheet, the chatbot will be able to fetch and display the latest information to subscribers.
How to Set This Up:
- Create Custom Fields: You’ll need to create two: Lookup Botfield: Used to match data inside the Google Sheet.
- Display Botfield: Used to store and display the retrieved data to the subscriber.
For this example, create:
-
Requested Class (the class name the user wants to look up)
-
Class Details (the information about that class, like time, location, or instructor)
-
Set Up Your Google Sheet:
Create a Google Sheet with column titles that match your custom botfields. For example:
Requested Class (e.g., Yoga, Pilates, Spin)
-
Class Details(e.g., Monday 6 PM, Studio A) -
Populate the sheet with the latest class information.
-
Connect Chitchatbot.ai to the Google Sheet (if not already connected)
Use the Google Sheets integration to link your bot with the sheet.
-
Ensure that the Requested Class field corresponds to the
Requested Classcolumn in the sheet. -
Fetch Data in the Bot Flow:
In your bot flow, include a step where the bot uses the Requested Class custom field to look up the corresponding data in the Google Sheet.
-
The retrieved information will be stored in the Class Details custom field.
-
Display Data to Subscribers:
Use the Class Details field to show the subscriber the most up-to-date information directly in the bot.
Now, your client can update the class schedule in the Google Sheet anytime, and the bot will automatically fetch and share the updated schedule with subscribers without any additional manual updates.
Getting Random Row
Similar to retrieving row data from a Google Sheet, you can also fetch a random row from the sheet, which is useful for creating dynamic and varied responses.
Example
Imagine you’re creating a Messenger bot that sends daily motivational quotes to users. To make it more engaging, you can randomize the quotes every time a user interacts with the bot.
You would have a Google Sheet with 3 columns:
-
Value Lookup
-
Motivational Quotes
-
Author
-
Ask the Subscriber for Input:
Use a user input block to ask the subscriber if they’d like to receive a motivational quote or perhaps quotes from a specific author.
-
Store this response in a custom field (e.g., “quote_type”).
-
Prepare the Google Sheet:
Your Google Sheet would have a structure like this:
Value Lookup: A placeholder to help fetch a random value (e.g., “Quote 1”, “Quote 2”, etc.)
-
Motivational Quotes: The actual quotes you’d want to share.
-
Author: The author or source of the quote.
-
Fetch a Random Quote:
Based on the subscriber’s choice (stored in the “quote_type” custom field), the bot will decide which column to fetch the random value from—either the Motivational Quotes or the Author.
-
Use the Value Lookup column as the reference to generate a random selection from the available rows in the sheet.
-
Display the Quote:
Once a random row is selected, the corresponding quote (and its author, if applicable) is saved to a custom field.
- This information is then sent back to the subscriber within the bot flow, and the motivational message can be displayed directly.
By setting this up, every time a user interacts with the bot, they receive a different quote or message, keeping the interaction fresh and dynamic.
Update Google Sheets Row
Another powerful feature of the Google Sheets integration is the ability to update existing rows with new data, instead of creating new rows every time. This is particularly useful when you want to maintain a comprehensive and up-to-date subscriber list for your client.
For example, when new subscribers first opt-in, you might initially capture basic information such as Name and User ID.
Later, when they opt-in for a lead magnet, join a loyalty program, or provide additional information, you may want to capture their email address or phone number. Instead of creating a new row for these new details, you can simply update the existing row for that subscriber.
The key to updating the correct row is the User ID. Since the User ID is unique to each subscriber and doesn’t change, it serves as the perfect lookup value to ensure you’re updating the right record.
Once you have captured the additional subscriber details (like email or phone number), you can use the Update Row action in Google Sheets. This ensures that your Google Sheet stays current with the most up-to-date information collected from your chatbot, filling in any missing details or updating outdated ones.
Clear Row On Google Sheet
Similar to updating a row, you can also clear a row in Google Sheets, following a similar process. This is particularly useful if you want to remove subscribers from your sheet who have unsubscribed from your bot.
To do this, you would use the Google Sheets -> Clear Row action. The process works as follows:
-
Select Your Spreadsheet and Worksheet: Just like with updating rows, you choose the relevant spreadsheet and worksheet where your subscriber data is stored.
-
Choose the Lookup Column: In this case, the User ID is the best option as your lookup value. Since the User ID is unique and doesn’t change, it will accurately identify the subscriber to be removed.
-
Clear the Row: Once you’ve set up the action, the system will find the row matching the User ID and remove it, ensuring that your Google Sheet stays updated with only active subscribers.
This action ensures that your sheet is always clean and reflects the most current data, automatically removing those who have unsubscribed.