Creating visually engaging content is a powerful way to enhance your chatbot’s interactions. With app.chitchatbot.ai, you can seamlessly integrate OpenAI’s image generation capabilities into your chatbot workflows. This guide will walk you through the process step by step, offering practical insights and tips to help you get the most out of this feature.
What is OpenAI Image Generation?
OpenAI’s image generation tool, powered by models like DALL·E, allows you to create unique, high-quality images based on text prompts. Whether you need illustrations, concept art, or custom visuals, this tool can bring your ideas to life.
By integrating OpenAI’s image generation into app.chitchatbot.ai, you can automate the creation of visuals for your chatbot’s responses, making interactions more dynamic and engaging.
Step 1: Set Up Your OpenAI API Key
(Skip to Step 3 if you already have OpenAI connected)
- Sign Up for OpenAI: If you don’t already have an account, visit OpenAI and create one. https://platform.openai.com/api-keys
- Generate an API Key: Navigate to the API section in your OpenAI account and generate a new API key. Keep this key secure, as it will be required for integration.
Step 2: Integrate OpenAI with app.chitchatbot.ai
- Click Settings > Integrations > OpenAI ChatGPT.
- Enter your OpenAI API key in the designated field and save the changes.
Step 3: Create a Flow for Image Generation
- Open Flow Builder: Go to the flow you would like to add the image generation to or create a new flow.
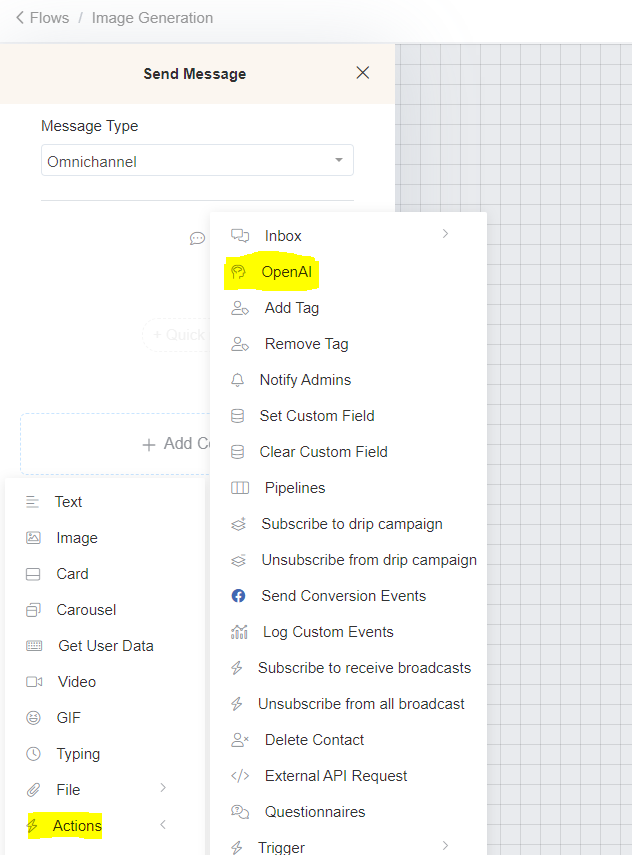
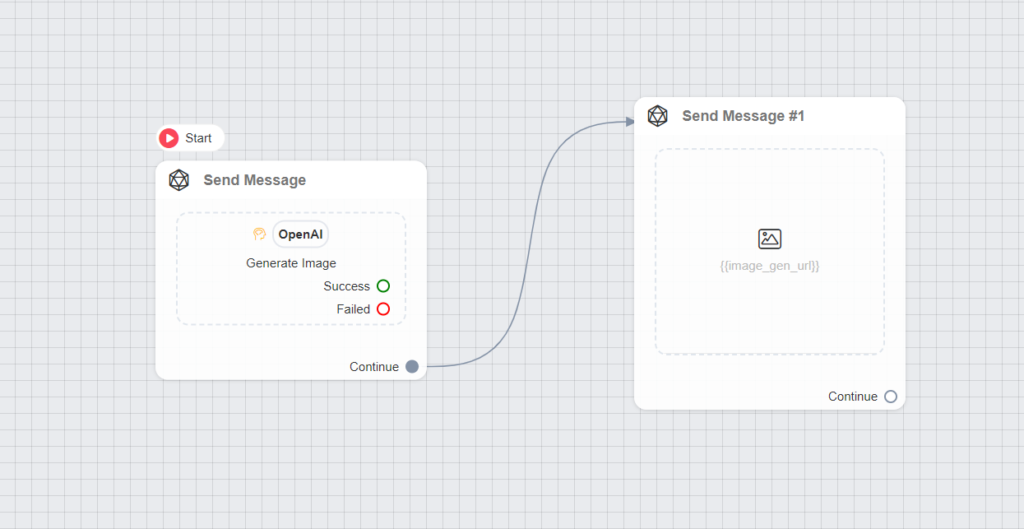
- Add an OpenAI Action: On your Message node block, click + Add Content > Actions > OpenAI.
Step 4: Configure the Action
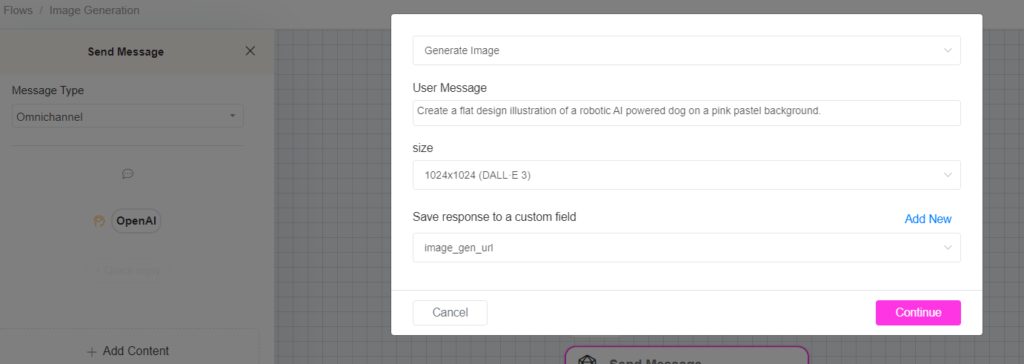
- Click on the action (within the node block and on the left side box) to open the configuration settings.
- In the dropdown, change “Generate Text” to “Generate Image”.
- The user message serves as the image prompt (instructions to the AI on what image to create). Example: “Create a flat design illustration of a robotic AI-powered dog on a pink pastel background.” You can also use custom fields to use a person’s response as the prompt or a system field such as {{last_input}}.
- Select your size and AI model (e.g., DALL·E 3, 1024×1024).
- Save response to a custom field: This field will store the image URL. You can select an existing text field or create a new one (e.g.,
image_gen_url).
Step 5: Add the AI Image to Your Flow
- + Add Content Block > Image > Insert Link.
- The image URL is the custom field where the response is saved (e.g.,
{{image_gen_ai}}). - Preview your flow and test if the image is generated as expected.
Practical Use Cases
Here are some real-world examples of how you can use OpenAI image generation in your chatbot:
- E-commerce: Generate product visuals or custom designs based on customer preferences.
- Education: Create illustrations for educational content or quizzes.
- Marketing: Design unique visuals for promotional campaigns or social media posts.
- Entertainment: Produce concept art or storyboard images for creative projects.
- Contractors: Generate quick inspiration mock-ups of kitchens, bathrooms, etc., based on user preferences.
Expert Tips for Effective Image Generation
- Be Specific with Prompts: The more detailed your text prompt, the better the results. Example: Instead of “a cat”, try “a fluffy white cat sitting on a windowsill with sunlight streaming in.”
- Experiment with Styles: Specify artistic styles (e.g., “watercolor,” “3D render,” “minimalist”) to achieve the desired look.
- Iterate and Refine: Don’t hesitate to tweak your prompts and regenerate images until you get the perfect result. If speed is crucial, try different models to see what works best for you.
- Use Custom Fields for Personalization: Include multiple user preferences in your prompts using custom fields. This makes the image highly tailored to that user.
