Facebook Comments Automation
Discover a new way to transform your Facebook page audience into loyal customers. With app.chitchatbot.ai, you can set up your Messenger chatbot to automatically comment on users’ posts and send instant replies to their messages in the inbox whenever they engage with your content.
You can configure comment automation for specific posts, all page posts, reels, or Facebook Ads, allowing you to enhance your business’s engagement with your audience effortlessly.
Managing Facebook comments is key to maintaining strong engagement and building a solid online presence. app.chitchatbot.ai simplifies this by ensuring fast and personalized responses.
Auto-reply to Comments: Automatically respond to users’ comments on your posts, keeping conversations active and timely.
Direct Messenger Replies: Send tailored automatic messages directly to users’ inboxes after they comment on your posts.
Benefits:
- Boosts engagement by maintaining active interactions.
- Enhances visibility on social media platforms.
- Saves time and effort while ensuring user queries or comments are addressed promptly.
- Automate responses to frequently asked questions.
- Provides as a fantastic organic entry-point into your chatbot experience
Where to setup comments automation
- Go to Tools & Automation
- Click Facebook Comments Automation
- Click Add
- Add a name – Ideally something relevant to the automation you plan to create.
Tip: Ensure you have admin access to the Facebook Page you want to connect.
After clicking, you’ll be presented with fields to configure your new rule.
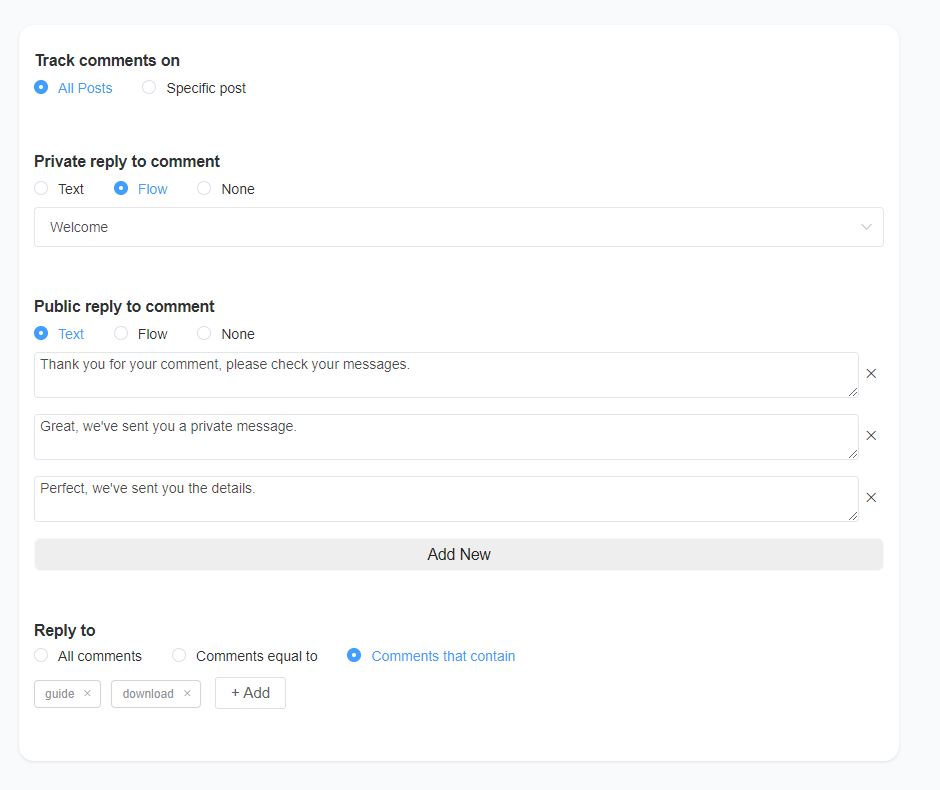
Track comments: All posts or specific posts
Reply to: All comments, Comments Equal To or Comments that contain
Your selections depends on your use case, but we generally recommend choosing “All Posts” to maximize your reach. This option lets you engage with a wider audience while allowing you to set rules for specific comments, such as those that match exact phrases or contain certain keywords.
If you choose “All Posts”, it’s usually best to avoid replying to “All Comments” to maintain relevance. However, if you’re tracking comments on a “Specific Post”, enabling replies to “All Comments” makes more sense for better engagement.
All Comments – Automatically replies to every comment on the post.
Comments Equal To – Replies only to comments that exactly match the keywords you specify. Comments that contain is usually a better option as people may include extra or unexpected characters, text or emojis in their comments.
Comments That Contain – Replies only to comments that include the keywords you define.
Private reply to comment: Text, Flow or None
This is the message that will be sent privately to the user after they comment. We recommend using a new or existing Flow to guide users after they comment, giving you better control over their interaction. With a Flow, users can click buttons you can track or receive AI-generated responses.
If you choose Text, a simple plain text message will be sent. Select None only if you don’t want to send a private reply—this is useful if you prefer to engage through public comments instead.
Public reply to comment: Text, Flow or NoneThis is the public reply that will be sent directly under the user’s comment. We recommend choosing Text and creating at least five variations, such as “Check your DMs 😊” or “We’ve sent you a private reply. Thanks!” to keep responses engaging and natural. You can also choose a Flow for a more advanced setup or select None if you prefer not to send a public reply. If you select “Flow” this will allow you to use any integrations or actions available on the flow builder. For example, you could use OpenAI to publicly reply to user comments using. We have a system field called {{last_fb_comment}} – this system holds the user’s last comment (text) on a post from Facebook, Instagram, etc.
More Options Configuration
You can access additional settings through the “More Options” link, which displays various on/off toggles. These settings allow you to customize how and when your replies are sent. Here’s what you can configure:
- Reply to New Contacts Only: Choose to reply only to users who are new contacts.
- Reply Once Per User Per Post: Ensure each user receives only one reply per post.
- Like the User’s Comment: Automatically like the user’s comment along with the reply.
- Reply to Previous Commenters: Option to reply to users who have commented on your past posts.
- Do Not Reply to Replies: Skip responding to users’ replies to comments, focusing on the initial comment instead.
- Set a Response Time: Choose how soon to reply, with options like:
- Immediately
- XX seconds
- XX minutes
- XX hours
- Random (within 3 minutes)
Tip: If you notice some public replies aren’t being sent, switching to “Reply After Random (within 3 minutes)” may resolve the issue. This setting helps prevent delays and ensures your replies go through.
Real-World Use Cases
Use Case 1: E-commerce Brand
An online store uses app.chitchatbot.ai to handle comments about order status, shipping, and returns. By automating responses to common queries, they reduce response time from 12 hours to under 5 minutes, improving customer satisfaction.
### Use Case 2: Event Promotion
A concert organiser sets up keyword triggers like “ticket availability” and “lineup” to provide instant updates. This ensures attendees receive timely information, boosting ticket sales and engagement.
### Use Case 3: Food Recipe
A food blogger sets up keyword triggers like “chocolate cake” and “recipe” to provide instant access to their recipe newsletter.


